Step 1 (See figure below) :
Type this address in your browser tab www.blogger.com/start

After that you will be directed at page making blog in blogger (See picture above). After that, click Create a Blog (See the circled tab and marked arrows).
Step 2 (See figure below) :
 At a later stage you will be directed to fill out your email form, your password, name your blog later, and so forth. After you have finished filling in all the forms are properly and correctly, is click the CONTINUE button.

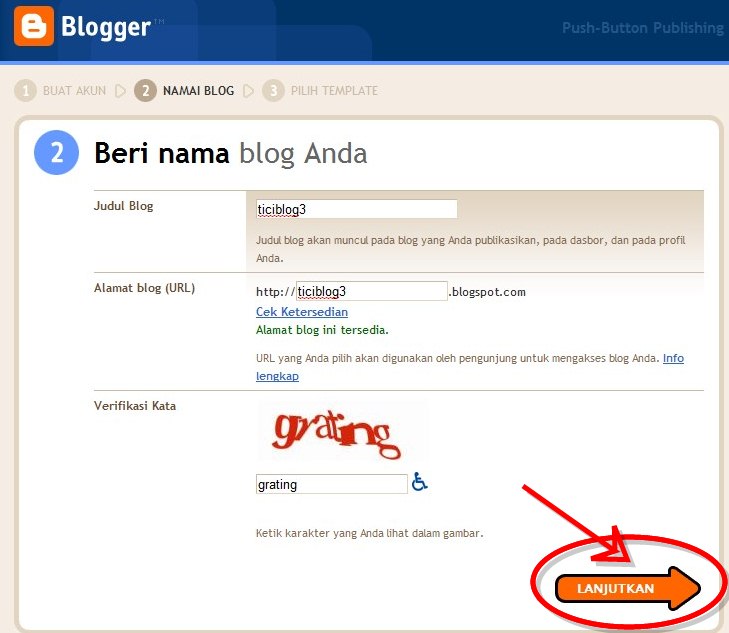
Step 3 (See Figure below) :
After completing Step 2, then you will be directed to the next stage to fill in the name of your blog, your blog url later. Please note, to fill your blog url would be, you should check the file first if you enter that url is available or not, if not available you have to enter another url. If the url you entered already available, then you first enter a word verification and then click the Continue button to proceed to the next stage.

Step 4 (See figure below) :
In step 4, you will be prompted to select one of the basic template of your blog. This template is a template that the contribution or endorsed by the bloggers themselves.

Once you select a template that will be the basic template of your blog, click the Continue button is to be directed to the next step.
Final Step (See figure below) :

Note: Images that I use in this tutorial-based Indonesian, because the picture I took from my blog that is speaking Indonesian. For that, I apologize if this makes you slightly less impressive for you.
After completing Step 2, then you will be directed to the next stage to fill in the name of your blog, your blog url later. Please note, to fill your blog url would be, you should check the file first if you enter that url is available or not, if not available you have to enter another url. If the url you entered already available, then you first enter a word verification and then click the Continue button to proceed to the next stage.
Step 4 (See figure below) :
In step 4, you will be prompted to select one of the basic template of your blog. This template is a template that the contribution or endorsed by the bloggers themselves.

Final Step (See figure below) :

At this final stage, you just choose the command to start writing articles or direct you see your blog first.
Note: Images that I use in this tutorial-based Indonesian, because the picture I took from my blog that is speaking Indonesian. For that, I apologize if this makes you slightly less impressive for you.

No comments:
Post a Comment